Coming to Week 4, we started the learning of applying material/texture
2.3 EXERCISE
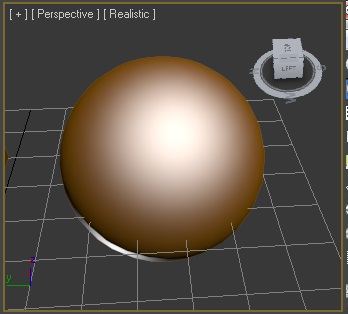
4. Adjust the specular colour to create a material which looks like a shiny metal
I edited the DIFFUSE and SPECULAR colour, also experimented with the specular level, glossiness and soften values to get the following effect.

=5. In a different slot, create a material which looks like wood
Without importing direct wood material, I had to reduce the specular level and glossiness, to try to make it look as matt effect as possible, trying to make it look more "wooden."


Exercise 1: Done
==================================================
2.5 EXERCISE: APPLYING ABITMAP
9. Repeat the above steps by applying the same bitmap to a SPHERE, CYLINDER, TEAPOT,
CONE and PYRAMID

Exercise 2: Done
==================================================
2.6 EXERCISE: PROCEDURAL MAPS
a. CELLULAR


I experimented it a little, which could also look like below.

b. DENT


c. MARBLE


d. NOISE


e. PERLIN MARBLE


f. SMOKE


g. SPLAT


h. WAVE


Exercise 3: Done
================================================
3 UVW MAP MODIFIER EXERCISE
4. For this example, select PLANAR in the PARAMETERS list under the MODIFIER STACK
5. Now use the ROTATE, MOVE and SCALE tools to replicate the positions of the projection
square in relation to the box the previous picture. Watch how the mapped image changes as you
move the GIZMO

6. Now select the CYLINRICAL, SPHERICAL, BOX options in turn and experiment with the
GIZMOS for each modifier


i. A sphere, using BOX mapping, can you describe how the image has been mapped onto the
sphere?
Box Mapping was basically projecting the 2D image through all the 6 directions like a box.

ii. Two spheres, one with SPHERICAL mapping and the other using SHRINK WRAP
mapping, can you see the difference? Refer to the online help


iii. A CYLINDER, with and without the CAP option enable
Left - Without CAP, Right with CAP enabled.

iv. A TEAPOT using FACE mapping

v. A TEAPOT, where there is one image of the moth on the whole teapot, which is mapped
over the top and down the sides, but DOES NOT go under the teapot, the image of the moth
lies over the top, see the screenshots below.


=SPHERICAL Mapping
vi. A box, so that the image only appears on opposite ends of the box and does not ‘bleed’ onto
other sides.


Exercise 4: Done
================================================
4 COMBINING PROCEDURAL MAPS

Exercise 5: Done
No comments:
Post a Comment