Week 2 on 3D studio Max
3 BOOLEAN OPERATIONS EXERCISE
Position a sphere in the centre of a long narrow box, so the sphere is visible on either side of the box,
as in the following picture. Try the various types of Boolean operations: UNION, INTERSECTION,
SUBTRACTION (A-B), SUBTRACTION (B-A).
= BOOLEAN OPERATIONS EXERCISE
To experiment the Boolean tool.
Original:

Union: The two objects became one.

Intersection effect. Only remained the intersected part.

Subtraction A-B effect. (Sphere=A, Retangle=B)

Subtraction B-A effect. (Sphere=A, Retangle=B)

Exercise 1: Done
==========================================================
5 GROUPING EXERCISE
1. Create four primitives: box, sphere, tube and cone
2. Group the box and tube together into a group called BOX_TUBE
3. Group the sphere and cone together into a group called TUBE_CONE
4. Now group BOX_TUBE with TUBE_CONE to form a group called ALL_SHAPES
5. Use the UNGROUP command on ALL SHAPES, how is the group broken down?
6. Re-create the ALL SHAPES group again
7. Now use the EXPLODE command on ALL SHAPES, how is the group broken down?
=GROUPING EXERCISE
 Question 5: When ALL_SHAPES was UNGROUPed, they were seperated into BOX_TUBE and TUBE_CONE
Question 7: When ALL_SHAPES was EXPLODED, they were seperated back into individuals.
Exercise 2: Done
==========================================================
7 ALIGNMENT EXERCISE
Using ONLY the ALIGN SELECTION window, align a box, sphere, tube and cone as in the following
picture.
=ALIGNMENT EXERCISE
 Note: To align selected object right on top of target basically
x, y positions : Current + Target Object = centre
z positions : Curent Object = Minimum, Target Object = Maximum.
Exercise 3: Done
==========================================================
10 EXERCISE
FRIST: sketch out a plan for a small derelict village for a first person shooter game. Also create rough
sketches of each building, how derelict it is and its overall plan. You should also add a few simple
internal rooms to your building and even two floors if you are feeling adventurous.
You now have all the basic modelling techniques to create houses, fences, and the outlines of ruined
buildings. Do not concern yourself with textures of lighting, only the modelling. Once you have a
sketch of the plan of the village go ahead and start to build it.
= 2D EXTRUDE EXERCISE
First of all, it was to draw the basic plan of the village, which was like the blue print.
 And then I ended up with this shape that I wanted, it was the centre of the fountain.


Such as these barrels, often seen in shooting game, like explosives etc.


Fountain.


I also created windows, and the derelict effect with the boolean tools

Some abandoned houses


Exercise 4: Done
=============================================
(Week 3 blog seems not shown on the blog automatically on my computer)
In case it does not, the following link is week 3
http://1012897.blogspot.com/2011/10/week-3.html
==========================================================
5 GROUPING EXERCISE
1. Create four primitives: box, sphere, tube and cone
2. Group the box and tube together into a group called BOX_TUBE
3. Group the sphere and cone together into a group called TUBE_CONE
4. Now group BOX_TUBE with TUBE_CONE to form a group called ALL_SHAPES
5. Use the UNGROUP command on ALL SHAPES, how is the group broken down?
6. Re-create the ALL SHAPES group again
7. Now use the EXPLODE command on ALL SHAPES, how is the group broken down?
=GROUPING EXERCISE

Question 7: When ALL_SHAPES was EXPLODED, they were seperated back into individuals.
Exercise 2: Done
==========================================================
7 ALIGNMENT EXERCISE
Using ONLY the ALIGN SELECTION window, align a box, sphere, tube and cone as in the following
picture.
=ALIGNMENT EXERCISE

x, y positions : Current + Target Object = centre
z positions : Curent Object = Minimum, Target Object = Maximum.
Exercise 3: Done
==========================================================
10 EXERCISE
FRIST: sketch out a plan for a small derelict village for a first person shooter game. Also create rough
sketches of each building, how derelict it is and its overall plan. You should also add a few simple
internal rooms to your building and even two floors if you are feeling adventurous.
You now have all the basic modelling techniques to create houses, fences, and the outlines of ruined
buildings. Do not concern yourself with textures of lighting, only the modelling. Once you have a
sketch of the plan of the village go ahead and start to build it.
= 2D EXTRUDE EXERCISE
First of all, it was to draw the basic plan of the village, which was like the blue print.

Then all the little decorations I would like to have in the village, such as a fountain, barrels, empty houses, abandoned boards, rubbish bin etc. Which I could create with this 2D to 3D technique.

Next, I used the extrude tool and edited the amount (height) to the values that I wanted 

There was one part of the fountain which I used a different technique to create,
the LATHE tool. I drew the basic shape with the line tools, then used the LATHE to spin it around.

After all the basic creations from 2D to 3D by the extrude tool.
I moved on to add lots of decorations in the village. As decorations are often important in a first person shooting game, where you could take cover etc.

Such as these barrels, often seen in shooting game, like explosives etc.

And abandon trucks etc, created by 2D rectangle, then converted to editable poly, Last edited with extrude tools, Chamfer tools etc.

More containers.
Rubbish bin
Fountain.


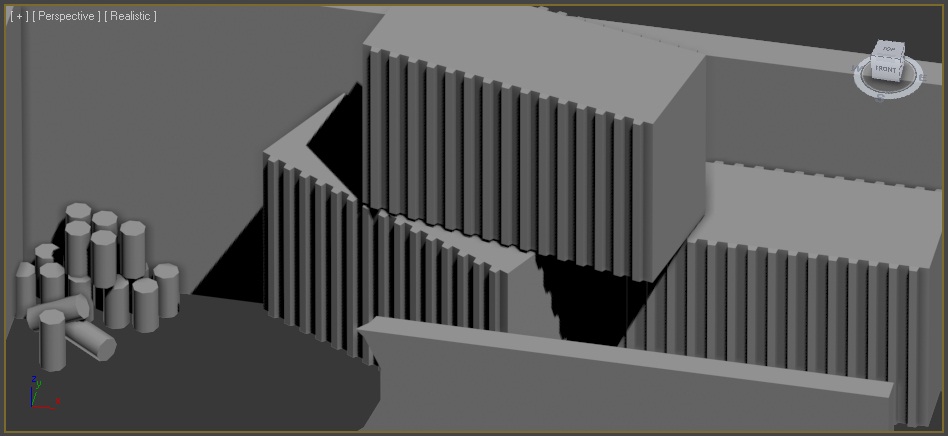
I also created windows, and the derelict effect with the boolean tools

Some abandoned houses

A stair which would lead to 2nd floor that I would build in the fllowing.

The second floor.


Exercise 4: Done
=============================================
(Week 3 blog seems not shown on the blog automatically on my computer)
In case it does not, the following link is week 3
http://1012897.blogspot.com/2011/10/week-3.html
No comments:
Post a Comment