Week 1 First exercise on 3D Studio Max
9 SHIP STEERING WHEEL EXERCISE
Create a ship steering wheel. Just create the basic shape using primitives, do not concern yourself with
trying to model rounded handles, rivets etc,…. Just the basic shape
=SHIP STEERING WHEEL EXERCISE

To create a basic shape of the ship Steering.
First I explored and tried all the different primitives geometries from 3Ds Max, then selected the ones which I found were suitable for the shape of the steering wheel.
First I used the tube to build up the centre shape, then added a slim cylinder for the bar.
By the AutoGrid box being ticked, I was able to build the cylinder on the surface of the tube.
When I built my tube, I edit the value in order to get 16sides, so that when I build the cylinders, I could make sure they were on the right places, as 16 = 8x2, which meant between every 2 edges I would build a cylinder.
Next I only had to repeat the process to get all the eight bars. Last I added a torus into the shape.
Exercise 1 : Done
==========================================================
12 HOUSE EXERCISE
Create a house with four walls, a floor and a roof and a chimney. The house should also have an
opening for a door and two windows on the front and one opening for a window on either sidewall. No
window is required on the rear wall. The house should be made to a realistic scale.
=HOUSE EXERCISE

To create a basic shape of the ship Steering.
After I was a little more familiar with the tools and primitive shape 3Ds Max provided.
I decided to start this exercise by creating every "parts" of the house and then put them together.
So they would be in a perfect size when I created them.


These parts including 4 walls, a floor, a root and all little parts to be a chimney.

Next I put those parts together in order to have the basic shape of the house.
I used the Align tool and Rotate tool to help me, therefore it would be built perfectly.
Then I started to build more "accessories" for this model. windows parts, door parts, entrance platform etc.

I simply moved them onto the right place.
In following, I started to experiment the "Segs" values, which controls the number of polygons on the geometry. So that I could create the holes as opened windows or doors.
(By right click> convert to editable poly)

At last I found out the perfect combinations on the width and height segs values.
Opening door and window on the front.

And on either side of the side walls


The final model:
In this exercise, I learnt how to convert a mesh into editable poly, editing polygons and using the align tool.
I also learnt to take care of the number of polygons when I built on 3Ds Max, which would be important in the modelling technique. As low polygon models could reduce the loading speed, especially in a game engine.
Exercise 2 : Done
==========================================================
13 CASTLE EXERCISE
Create a castle: four walls with raised battlements and ramparts, arched entrance, a watch tower on
each corner and an inner keep with an entrance. You may also wish to add a moat and drawbridge!!!
Do not worry about texturing the model just yet! We will cover this in following weeks.
=CASTLE EXERCISE


To build a castle.
Last exercise of this week is to build a castle.
As the house building experience, I built the castle in a similar process.
First was to build all the "parts" of the castle that I would like to have.
Eg: Guard tower, rampart, walls etc.
After that I would put them together to form a castle.

These towers are formed by several primitives, such as cylinders, cone etc
And more importantly, it was the tools the I had used that mattered.
To put all those part together, I used the align tool.
By adjusting the x,y,z positions I could put them together perfectly.

The battlements on the towers, these could easily be created when I converted them into editable polys, then selected the polygons and used "Extrude" tool.
So they looked like the battlements, only point the I had to bewared of was the number of segs when I extruded the polygons.

One of the most important tool I needed was the group tool, because there were many parts to form up a tower, so group tool was used many times in the whole modelling process.

Another tool I used was the Boolean tool, in order to subtract holes on the model.
By doing that I could create the "windows" on a tower.
In the following, I built the entrance with a gate and the bridge.

The entrance was built by the Boolean tool, I subtracted a box n a sphere from the wall.
So that I had the shape of the entrance.
The gate was done with a L-shape primitive, and by the Extrude tool, I formed the shape of the gate.
 There was another tool that I used for the pointed end of the gate, which was the outline tool.
So that I had the shape of the entrance.
The gate was done with a L-shape primitive, and by the Extrude tool, I formed the shape of the gate.

Similar techniques had been used over many many times when I build the castle, so I wouldn't note anymore down for now.

I built more details on the front gate wall.

Rounded up the bars of the bridge by selecting the edge and used "chamfer" tool.

More extrude and outline tool technique on the wall.


Building the watch tower.

A house similar to the previous exercise.


When I had finished all the basic models I wanted, I then moved them, copied them to form the final castle.

Final model:


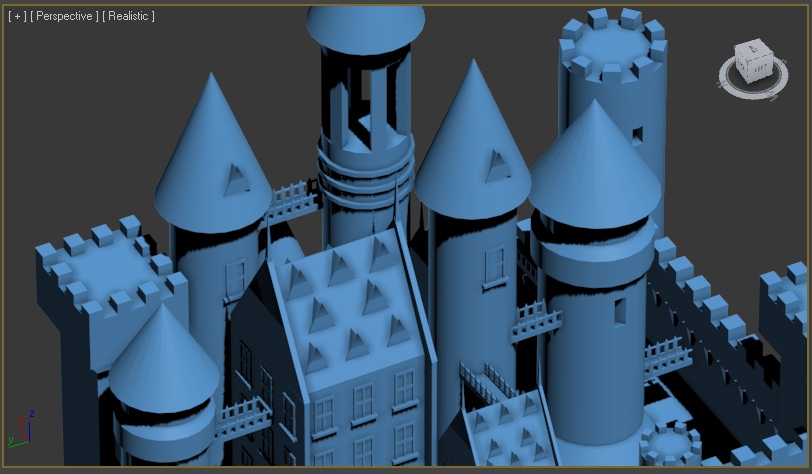

Exercise 3 : Done
No comments:
Post a Comment